Eliminate Questions
This one is easy. Some students require shorter assignments, or more time to complete assignments. If possible, you can give some students ten questions, make a copy of the form, delete some of the questions, and push out the shorter quiz to those that require it.
Print the Google Form
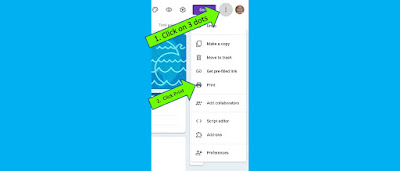
I've had students that have had paper/ pencil accommodations for tests. Even for our state testing, while the test was on the computer, these students were tested in small groups (or individually) using a paper copy of the test. Or maybe you have a new student who doesn't have a computer or log in yet. It's easy to print a copy of the Google Form. Note that each question will print out on a separate page (which is actually another accommodation). You just click on the 3 dots, and Print will be in the dropdown menu.
Limit Answer Choices
Maybe a student will be more successful if he/she only has two multiple choice answers to choose from, rather than four. Or maybe limit it to three choices. Either way, you're not changing or lowering expectations.
Add Sections to Show One Question at a Time
This one was an aha for me. Some students have accommodations (or would benefit from) less visual clutter. In my experience that has meant anything from having to make tests with 2 questions per page, to giving students one of those rulers with the center cut out so they can really only focus on one line of text at a time.
When you make a Google Form, it naturally defaults to scrolling to get to the next question. With sections, students must answer a question, then click NEXT to see the next question. They see only one question at a time.
To make sections, after you create a question, click on the icon that looks like a giant equal sign on the right of the question (in the yellow circle above). It will call the section "Untitled Section". I just delete "Untitled Section" and it looks seamless.
You might be wondering how I make my questions. One of the first Google Forms resources I created was one on area of a rectangle. It wasn't something I could just type in the form, I needed labeled rectanglular shapes. So, I made PowerPoint slides of what I wanted my questions to be, saved them as a jpeg [SAVE as JPG] and then dragged the pics to the question section.
Change the Font
Another easy one (which wasn't the case always). When you click on the artist's palette on the top right, in addition to various headers, you can choose from about four fonts. I've had students who were visually impaired, so fonts with serifs (like Times New Roman) were a no no. Serifs are the fancy little edges on some letters. Unfortunately, as of now, you can't change the size of the font. BUT, the work around goes along with what I described above. I make a PowerPoint of the questions (with fonts as big as I want them) and save the slides as a jpeg.
Change Colors
Some students do better with different color combinations of text and page background. White on black, black on white. I remember many years ago, I heard of a study that said students did better on math tests if they were printed on yellow paper. Back then, we didn't have Astrobrights (I know, right) so that meant using goldenrod paper. I ended up printing all of my math tests on goldenrod paper. Not sure if it helped, but I like to think it did.
Other than changing the side color, (click up on the artist's palette and there will be a limited choice based on the header you choose) the only real way to do this is to (broken record --sorry--) make your slide questions as a PowerPoint and save each question as a jpg. (I'm using jpg and jpeg on interchangeably because I use a Mac and a PC.)
Provide a Link for Read Aloud as One of the Answer Choices
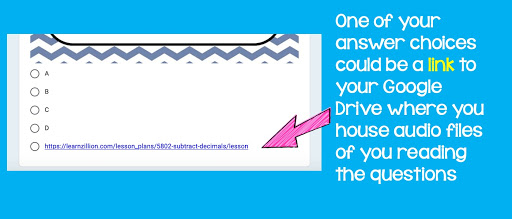
Now this one is a little tricky, and I'm still learning about it, but it seems to work. If you have a student with read aloud accommodations, or maybe an EL student who would benefit from questions being read aloud, you can make it happen. First, record yourself reading each question (separately). You can use your phone's Voice Memo app. Click on the memo and you get the option to send it to someone/ somewhere (that's the square with an arrow pointing up). I send it to my Google Drive. Then, on my computer I can open up my Drive and find the link. Copy the link of the mp4 (right click, get shareable link, turn on sharing) and paste the link as an answer choice on your Google Form. You're probably going to be working from a copy of your form, so not everyone gets the accommodation. Or put it there for everyone, and only those that need to, will use it.
If you show them a few times, how to use it, you will be golden for the rest of the year.
Provide Remediation through Links
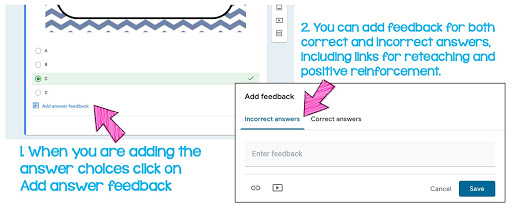
I read up on this one, and here's the premise: if a student gets a question wrong, you can add feedback with a link for a reteaching video. Then they can continue to the next question. It's called branching. Kasey Bell at Shake Up Learning does an amazing job at explaining how to do this. She has written a whole post with great visuals explaining how to do this. I'm still learning.
Provide Immediate Feedback
Remove Answer Choices & Make it Fill in the Blank
This might be more of an enrichment type idea, but maybe some kids in your class get multiple choice, and some get fill in the blank. You're assessing the same standard, just in different ways for different kids. Be careful with fill in the blank. Sometimes you will write that 10 cm is the answer, and a child might put 10 or 10cm (no space) and the computer will mark it wrong because you wrote 10 cm as the answer. There is a way to tell Google forms to accept all of these answers, so you're not having to go back and fix grades, if the computer only accepts the 10 cm that you wrote.
To make the quiz accept all version of 10 cm, you choose "ADD ANSWER" for all the versions you think a child might write for the answer (see example above) and check the box that says Mark All Other Answers Incorrect.


